


How to make a captioned picture
How to Make a Captioned Picture
By RodwenofRohan
A humorous captioned picture, if done right, can be lots of fun to make, and very funny to read. This article will give the basics of making a captioned picture.
What is a captioned picture? Good question. A captioned picture is a photo that has been either edited with text or had a word balloon attached. Usually, a captioned picture tells a story, but it can also be a one-liner that explains a situation the picture provides.
How do you make a captioned picture? You need a basic photo editor. The most basic is the Paint program that probably came with your computer. This tutorial will show you how to use Paint. You can also use a photo editor like the Print Shop. However, in this article, we will assume you are using Paint.
The goal of the captioned picture is to make others laugh. Your first step, therefore, is to find a picture with potential humor. You can use a search engine to find an image, or you can browse the gallery here on CoE! Usually, a close-up with strange facial expressions, a movement shot, or a conversation shot have good potential. A far angle or back shot are usually harder to caption.
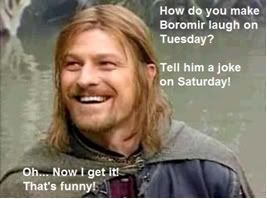
 There are several reasons this picture works. First, Boromir has a great smile. Second, there are some blank spaces near the top and bottom that text can be placed in. Third, the background is a uniform color, making captioning easier.
Save your selected picture to your computer, then go into the Paint program. Open your photo. Select the Writing tool (usually shown with the “A” symbol) and select an area to type in. People read from top to bottom, left to right, so organize your lines accordingly.
I like to think about what might be happening. What is making him laugh? Why is it funny? There could be something funny happening just off camera, or he could be listening to something… Perhaps he has just understood a joke… I am going with the story that someone told him a joke a few days ago and he only just got it.
 Select an easy-to-read font, and a contrasting color, so people can read your joke. I would not want to pick grey, because the background is also grey. I chose white, but light blue, pale yellow, or even lime green or bright orange would work!
You then want to type your lines into your picture. Remember, placement is very important.
If you put a line of text on, or directly next to, a character, it usually tells what that person is saying. Thus, the line “Oh now I get it! That’s funny!” is obviously what Boromir is saying.
You may want to test your captions out on a few friends or family members. If they don’t think it’s very funny, you might want to think about changing your lines, or even trying a whole new situation.
When you are done, don’t forget to save. I usually select the “Save As” feature, so I can keep my original picture. Now share it with your friends and enjoy!
Here are some other pictures I have captioned – enjoy!

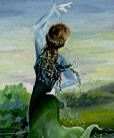
Why is Saruman waving his arms? A choir, maybe?

Keeping the caption close to the original, then changing it, can be funny if you do it right!

Here is an example with a bubble. Just select the circle/oval maker, and then type over the filled circle. This is especially useful when you have a multi-colored background.
I have shown you how to make a captioned picture! Now go make your own, and remember this one thing above all else- HAVE FUN!!

3 Comments
I love this! Especally the Boromir picture.
hahaha…awesome. Boromir is so cool.
Those pictures are awesome!! Do you know if I could do this on Photoshop?