Coloring
Shaded Objects with PhotoShop |
| |
|
|
|
I am not an educated
or special trainer in things, so this tutorial will just describe how I create
things and might help you with some easy steps.
This tutorial will show you
tips for using Photoshop, and especially coloring pencil drawings and already
shaded pictures in Photoshop.
What
you need:
Photoshop 6-7
Scanner
Drawing (of course)
|
|
 |
| |
|
|
|
1. Scanning
and Cleaning
If you finish a drawing, you
should try to clean the drawing as well as you can using simply erasers,
but you will see, if you scan the drawing, make it darker and give
it more contrast, that there are still some stains on the white paper.
Scan the picture with a high resolution, approx. 300 dpi. with approx.
3000 px size. That works pretty well, but if you have a slower running PC,
you can scan it smaller, to make the working faster and easier. After
you’ve scanned the picture, start cleaning it in Photoshop. You can use the
eraser tool or simply a white brush, it doesn’t matter what tool you use
for this step. Try to get a good contrast on the greyscale scan, you can
adjust it in the color tone menu.
|
|
 |
| |
|
|
|
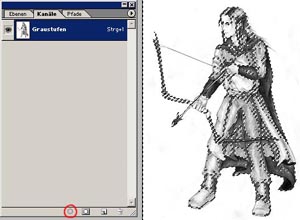
2. Color Channels
First go to your picture
settings and check “RGB” if you don’t have it already, after
that mark the whole picture, copy it, than delete it and paste it inside
the same file. You will get now two layers, one white one, and the one which
you’ve pasted in. Now go into your layer menu and click on the “channels”,
but be sure that you are in the layer with your drawing! If you have a
greyscale picture you’ll just see one color channel, but if you have RBG or CMYC
mode you see one for every color. Now click on the circle symbol on the
bottom – this will mark all white tones in the picture. After that press
“DEL”. Now your picture looks really light and empty. Now click
“invert selection” in the selection’s menu, after that take
a big brush, with 100% opacity in black, and color the whole picture
with it. You will see that it will just color the dark shaded places. You
can see the final result on the screenshot I made, I just hid the white
background, so you can see that the black shading of the picture is almost
transparent now.
|
|
|
|
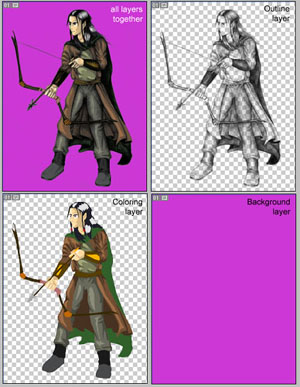
3. The Coloring
Now create a new layer, between
your already existing ones To make the navigation easier, give them names.
You should have now the same layers as I have here on the screenshot.
Now make sure that you are in the “Coloring” layer, and you can color
the different parts of your drawing, using the different brushes.
But always be sure that you are in your “Coloring” layer!
In the first step of the coloring, just color the drawing with its groundcolor,
no shading objects or anything. To make the coloring easier, go into
your outline layer and make this one a little bit transparent, and put
the opacity at approx. 60%, then go back to your color layer.
You can see on the two different
screenshots how it will look after you’ve created a ground coloring, one
shows all the layers and the other one just shows the coloring and the background
layers.
|
|


|
| |
|
|
|
4. The Shading
You can make the shading in
the same way you already created the ground coloring, take a brush and
make the opacity of your outline layer more transparent so that you can
see the color layer better. Now make these parts you shaded lightly
on your pencil drawing lighter and make the darker ones darker. You can see
on the screenshot I took how all my layers look now, after I’ve finished
the shading. The next step is to make the shading more smooth. Now go
into your color layer and hide your outline layer, so that you just see
your background and color layers. Now mark everything on your color layer
and go to your layers menu. There is a little square with grey/white
chequer, click on this one, but always be sure that you are in the coloring
layer! After that take the lasso tool and unmark the face and the hair.
(you need the lasso with the “-” there!) Now you can use the
“soft-focus-effect” on your already marked coloring and shading,
and if you checked that little square symbol, you will still have an exact
outline there! The face and the hair should be better blurred with the
blur-tool by hand! And voilá, the coloring is almost finished!
|
|

|
| |
|
|
|
5. Finishing
You can now change and adjust
the opacity of the different layers, to see which effect you would like –
a darker outline, a softer coloring or whatever you like! You can also
add a real background to your picture, because your whole figure has a
transparent and smooth border. I hope I could help you with these
steps. The example you saw here was colored pretty quickly.
|
|
 |


1 Comment
This helps a lot. 😀