


A Fire Pit for Fun!
~ by Wulf_Sternhammer
Ever watched a movie that has a group of people all sitting around a large outdoor fire enjoying themselves? Or have you ever had the pleasure of camping and sitting around the campfire after dark just staring at the flames? Well have you ever thought about building a fire pit in your own back yard, so you can enjoy the simple pleasure of sitting around the fire with friends, toasting marshmallows, or sipping a glass of your favourite Chardonnay? It’s easy! I have been enjoying my own for ten years now, and it was the best 2 afternoons spent!
Firstly, you need a clear area to build the pit. This will require about a 5’ diameter for the pit itself, and a further 8’ – 10’ surrounding this, clear of trees, shrubs, overhanging branches, or combustible surfaces. This should fit in with the fire codes of most areas. If unsure, contact your local Fire brigade or municipal authority.
What You Will Need:
– Bricks. The exact quantity will depend on the diameter of your pit, the shape of your pit and the size of your bricks (most bricks I have come across are 9”length x 4”width x 3”height, though variations do occur).
– Cement and sand to make mortar or a commercial pre-mix mortar.
– A spade (a long handle, post hole spade is preferred, but a short, ‘D’ handle spade will do).
– A wheelbarrow (to mix the mortar in)
– A concreting trowel
How To Build
Mark out the shape of the pit before you dig the hole. I have a round hole, my neighbour made a rectangular one. I have found that a round pit is not only more pleasing to the eye, but draws better (the updraft is more consistently stable – less turbulence).
The hole needs to be dug to a depth of 4 bricks, and approximately 12” wider than the internal dimensions of the pit. When the hole is dug, level the bottom with a bit of loose soil from the hole, then arrange the bricks for the bottom or base layer. I laid a single row of bricks lengthways across the hole as a starting point then across the other way to form a cross, and then filled in the spaces. This did involve breaking a few bricks to fill up some smaller spaces so the patterning is up to you. It is important to remember that the edge of this layer is to be the base of the pit walls. Do not mortar this bottom layer as it needs to be able to drain freely, so it will not hold water if it rains.
For the next layer, place the bricks end to end around the edge of the base, using mortar between the ends of the bricks, but not to the base layer. To make the mortar, combine 1 part cement to 5 parts sand and mix with water until I stiff paste is formed. If using a pre-mix mortar follow the directions on the bag. When this is done, apply a layer of mortar, approximately ¼“ thick to the top of the row, then lay the next course. This course needs to be off set to the course below.
With the final (top) row, the bricks need to be radiating out, ie placed lengthways pointing away from the centre of the pit. To do this, the space around the outside of the pit, behind the bricks, needs to be carefully backfilled to within ½” of the top of the second course, and gently firmed down. Apply another layer of mortar to the top of the second course of bricks, extending it back so that the top layer of bricks will rest on it. Remember to mortar between the bricks as well. If all has gone well, the top row of bricks should sit about an inch above the surrounding ground level. I spread some old carpet around the pit area and spread bedding sand around to fire proof the area and to add to the aesthetics.
The completed pit will require roughly a week to cure before lighting a fire in it, as this will help prevent the mortar from crumbling, caused by excess moisture expanding. It’s a good idea to have a small fire for the first time. After that, go for it!
The area around the pit can be landscaped to however you like, I made seats by cutting slabs from logs, and resting them on blocks, also cut from logs.
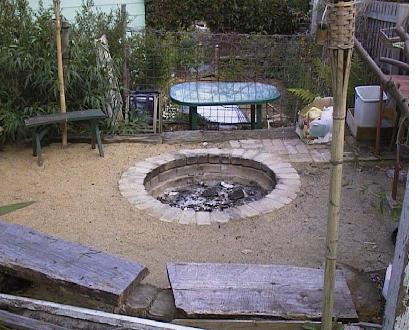
This is a picture of my pit a few weeks after completion. The lower area where the green table is, is where I have now built my outdoor kitchen, a photo of which I will post as soon as I get around to taking one.
If you get around to making one, using my way or not, enjoy the pleasure a fire pit brings.
Live and love
Wulf.
