


Cartoon Doll Tutorial – Pixeling a Hobbit Lad
Making Cartoon Dolls has become a major point of interest in online communities. It’s no surprise that several fans of Middle-Earth have fallen into the addictive hobby. Many tutorials on the internet are about modern clothes and characters — here, I will create a series of tutorials so that aspiring dollers at CoE can have an idea of where to start creating their very own LOTR themed dolls.
*** This tutorial is meant for Photoshop Elements. Many of the same principles apply in regular Photoshop. I know that many aspiring dollers don’t have these programs, however, so I’ll be making the same doll in Paint, and I’ll explain how to do it in paint as I go. ***
Today we’re making a hobbit-lad!
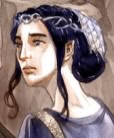
We’ll be using Angy Chan’s amazing Oni base. (See image 1-1)
Her dolls and bases are beautiful – you can see her wonderful work at http://www.yumestudio.it/angychan/. Please don’t hesitate to go take a look!
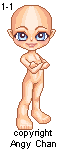
To begin, copy and paste the base into whatever program you’re using. Go ahead and save the file. (You’ll want to be sure to save often, so that if you make a mistake or your computer goes whacko, you’ll have your progress.)
*~* CHAPTER ONE: HOBBIT HAIR *~*
We know that every hobbit lad has thick, curly, adorable hair! Our hobbit is going to have brown locks; we’ll use this color scheme. Copy and paste it somewhere near your base!
(see image 1-2) 
To begin, zoom in on the face until you’re comfortable with the size you’re working with. Use the dropper tool (there should be one on either program) and select color 2 from the color scheme. (If you’re using PSE, you may want to create a new layer.) Using the pencil tool, draw the outline of the wavy hair.
The basic way to do it is draw curvy lines around the shape of the head, then create some curly bangs on the forehead. If you want the extra-messy-hobbity look, add a few random lines coming off the hair, and make sure you let it appear in the back, near the neck. After you have the basic outline, make curvy lines inside to give the hair more definition.
(see image 1-3) 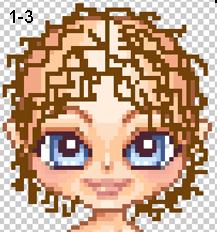
Next, choose color 3 from the color scheme and fill in the blank areas between the lines you’ve created. You can do this with the fill/paint-bucket tool or with the pencil tool. I would use the pencil for more precision.
(see image 1-4) 
* ~ Shading the Hair ~ *
This is where the real differences between PSE and Paint are revealed. For the sake of avoiding confusion I’ll cover Photoshop shading first, then I’ll cover Paint shading in a separate section.
::Photoshop Elements Shading::
Using the ‘dodge’ tool on size 2 or 3, go between the darker lines already in the hair to create highlights. You can make the new lines as wavy as you want; just make sure they go from top to bottom, not just here, there and everywhere.
(see image 1-5) 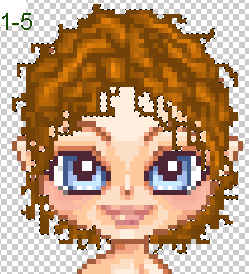
Using the ‘burn’ tool on size 1 or 2, go over the shadows that already exist. You can also go in places that were not highlighted. Add more shadow in the hair around the neck, but make sure you define the hobbit’s curls!
(see image 1-6) 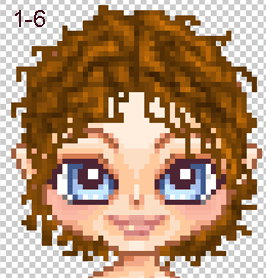
The finished product should look similar to this: (image 1-7) 
* Paint Shading *
(note- you can still use the pictures from the PSE shading section as reference)
If you have to shade in paint, things become more complicated. First, pick color 4 on the color scheme and add highlights in between the lines that you put in the hair earlier. Make them wavy, but be careful to leave a good bit of color 3. Next, pick color 1 and add shadows by making wavy lines near darker areas – especially around the neck. Try not to put Color 1 and Color 4 right next to each other! The contrast is too extreme; you need colors 2 and 3 to be between these two colors when possible. When I shaded my hobbit’s hair in paint, this is what I got: (image 1-8) 
The same rules apply for a hobbit-lass; she would just have MORE hair to shade.
*~* CHAPTER TWO: HOBBIT CLOTHING *~*
Hobbit clothing shouldn’t be too hard to visualize for any fan of Middle-Earth. For the first part of this section, we’ll concentrate on the torso- vest and jacket. We’ll be working from the topmost layer of clothing to the bottommost.
SECTION 2-1: JACKET
This is the color scheme for the jacket. (see figure 2-1)

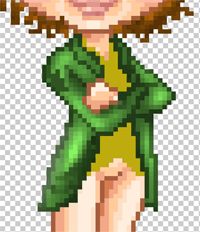
To begin the jacket, select color 1 on the pallet, and start by drawing the collar. Note that it has a slight curve. When drawing the jacket, keep the lines close to or right on top of the lines that make up the outline of the base. Make sure that you don’t cover the hand!
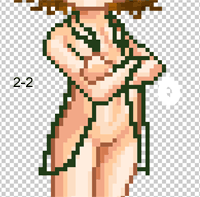
Now you have your outline. (see figure 2-2)
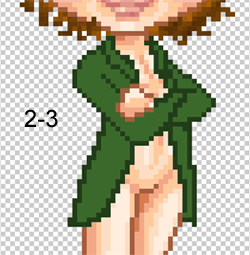
Now pick color 3 on the pallet and fill in the jacket, using the fill/bucket tool or the pencil tool. (as always, I would use the pencil) (See figure 2-3)
This is where the shading, once again, goes two separate ways. First I’ll cover Photoshop shading, then I’ll cover Paint shading.
::Photoshop Shading::
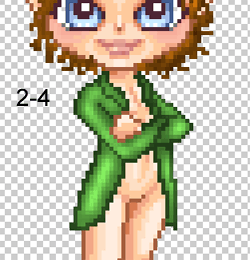
Select the Dodge tool and add highlights along the sleeves and other areas. Don’t make them *too* smooth.
(see figure 2-4)
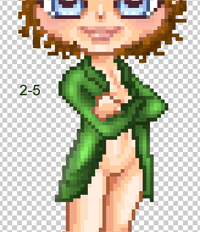
Select the Burn tool and add shadows to give the impression of depth and make the jacket look more like fabric. Add a few creases around the tail and on the sleeves.
(see figure 2-5)
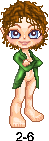
The finished product should look something like this: (see figure 2-6)
* Paint Shading *
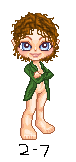
Select color 2 from the pallet and add highlights. Remember, don’t just use straight lines. Add color 4 as shadows, remembering to include folds and creases around the tail of the jacket. You might want to go back with color 3 and touch up. Remember not to put colors 2 and 4 right next to eachother.
The finished product, if you’re using paint, should look something like this: (see figure 2-7)
SECTION 2-2: VEST
The vest is pretty simple. We’ll make this hobbit’s vest yellow, and we’ll use pencil shading (the paint type of shading) to give it a more ‘rustic’ look.
This is the color pallet. Copy and paste it near your base (see figure 2-8)

If you’re using Photoshop, create a new layer.
Select color 2 on the pallet and draw in the vest. Instead of just doing an outline, we’ll go ahead and fill in the area of the hobbit’s chest, leaving a v-shaped neck. The bottom should be fish-tailed. (see figure 2-9)
Now select color 1 and add a few shadows. (see figure 2-10)
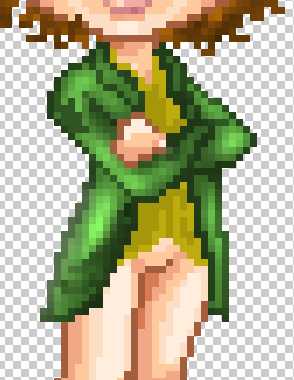
Now select color 3 and add highlights. Substitute any color for 4 and give the vest some trim. I would suggest something like brown or orange.
If you’re using Photoshop and you don’t like the ‘rustic’ look, select the blur tool and blur the colors a little.
Without blurring, the finished product should look something like this. (see figure 2-11)
Yay! You’re done with the hobbit’s torso! Alas, the poor boy is still without pants. Onward!
SECTION 2-3: PANTS
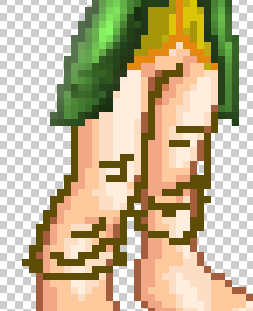
Our little hobbit will have brownish pants. As we all know, hobbit pants stop a little below the knee, kind of like Capri pants.
This is our color pallet. Copy and paste it near your (now almost fully clothed!) base.
(see figure 3-12)

Create a new layer for the pants if you’re using Photoshop.
To begin, select color one on the pallet and draw the outline of the pants. You can keep pretty much to the shape of the leg, just not right on the lines. Stop just below the knee, and draw a slight downward curve, not a straight-across line. Add wrinkles at the bottom and knee. *keep in mind that one leg is further back than the other, so the length will look different with each leg* (see figure 3-13)
Pick color 3 on the pallet and fill in between and around your lines.
** Photoshop Shading **
Use the dodge tool, as before, to add highlights around the middle of each leg, and on *top* of your ‘wrinkles.’ (see figure 3-14)
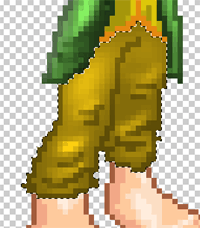
Use the burn tool and add shadows, mainly around the edges of each leg, and under your wrinkles.
(see figure 3-15)
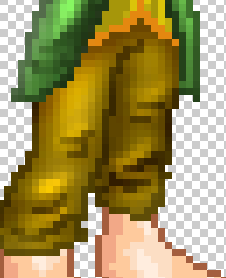
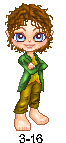
The finished product should look similar to this: (see figure 3-16)
Well, your hobbit is almost complete! Only one thing left to do- can you guess what?
Of course – the hairy hobbit feet!
If you’re using paint, just use the dropper tool and copy a shade of brown from the hair and add a few dots to the top of the feet. If you’re using Photoshop, you can use the paintbrush tool and select a “fuzzy effect” brush, or just use the paint technique.
Here’s the completed hobbit!
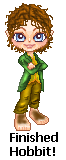
If this was your first try at dolling, don’t fret if he didn’t turn out exactly like you wanted. Practice makes perfect!
Please remember that if you post your hobbit anywhere online to mention that the base is from http://www.yumestudio.it/angychan/, and that DD made the tutorial. I hope that you had as much fun as I did!
~ Dreamdancer
