


Coronation Banner/Standard
~ by Celt

I really enjoyed making the Coronation Banner/Standard. On a scale of 1-10 in difficulty, I’d rate this project a 5. Here are my detailed instructions for creating it:
(Click on image to the right for full-size photo and more detail!)
Materials
– Fabric –
Light Cream colored satin or silky type (medium weight) fabric. Amount depends on the size you want to make the banner.
– Patterns –
Print and enlarge as needed to fit banner. Click on pattern images below for full-size patterns.
– Transfer Paper & Ball Point Ink Pen –
Dressmaker’s Tracing Paper – can be purchased in the sewing section of department stores or in fabric stores
– Flowers for Tree –
Small, 1 inch in diameter, silk type flowers (cream colored), star like in shape. Can be purchased, very inexpensively, at craft stores in the floral department. The ones I purchased for this project, were in a cluster, or bunch, on a stem (one faux plant). Color I used – light cream, with a light wheat/champagne colored center
– Paints & Glue –
Dimensional fabric paints + one bottle of acrylic paint.
Brands & Colors:
– Folk Art: #659 Metallic Pearl White Acrylic Paint
– Tulip Dimensional Pearl Fabric Paints: Antique Gold & Ivory
– Tulip 3D Glitter Paint: Champagne (gold glitter paint can be substituted)
– Scribbles 3D Fabric Paints: Iridescent Silver, Glittering Silver, Iridescent Golden Brown, Iridescent Gold, & Shiny Butterscotch.
Empty, small – 1 oz. – plastic squeeze bottle (available near fabric paints in craft store.
Glue – “Aleene’s – OK TO WASH IT” fabric glue.
=====================================
Prep
Clip the plastic center away from the flowers, and pull them (flowers) off the tiny stems. Set aside for later.
Cut out fabric into the shape of the banner = long, coming to sharp tapering point at the bottom. Cut two pieces (front & back). Set back piece aside. Two pieces are optional.
Using *Dressmaker’s Tracing Paper, transfer patterns (tree, crown, & lower interweaving) onto the fabric. Place tracing paper under pattern, and simply trace over it with a ball point ink pen – using firm pressure. Do these one at a time – trace pattern, paint, & allow to dry after each section.
*NOTE* With the tracing paper – don’t use pins to secure the pattern. It can accidentally transfer a spot of color where attached. Use tape!
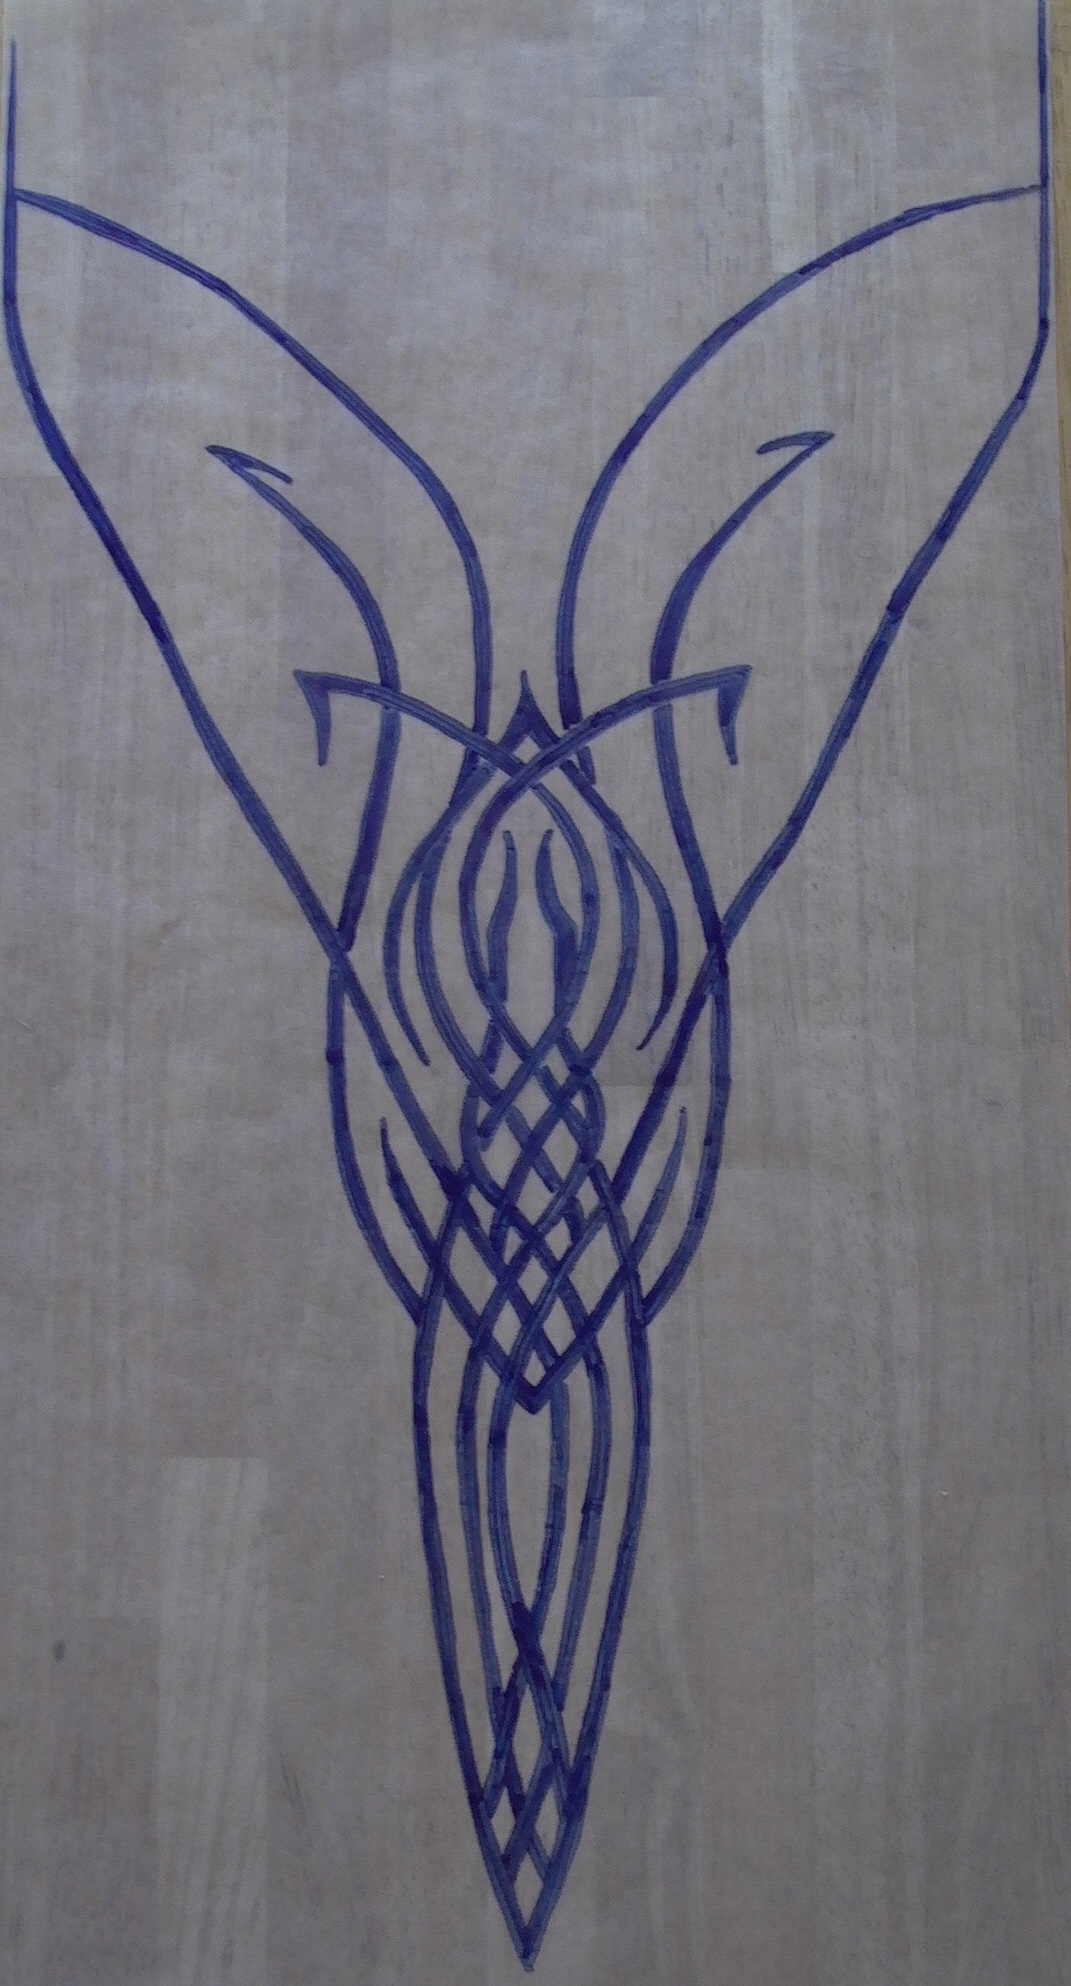
Patterns (Click on images for full-size patterns)

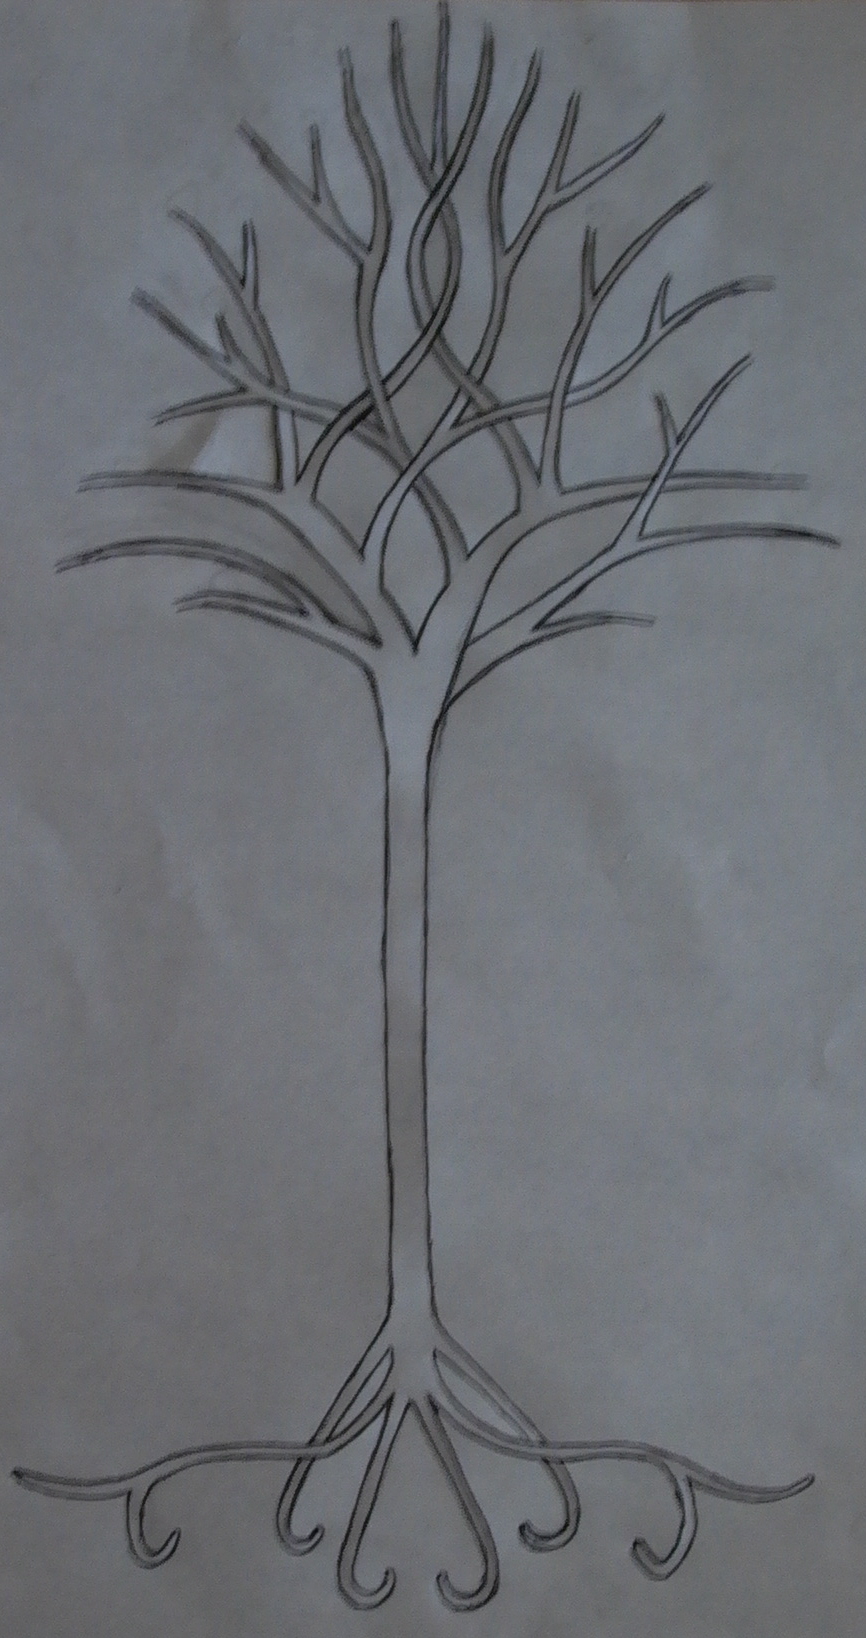
Tree
Following pattern, outline the edges of the branches, trunk, & roots with *Tulip Dimensional Pearl “Ivory” fabric paint; allow paint to have a slight, raised edge. Don’t flatten it out. Emphasize the interwoven nature of the tree. When dry, fill in with *Folk Art #659 Metalic Pearl White Acrylic Paint.
When dry, glue the flowers in place – to the ends of the branches using the fabric glue.
After the glue has dried, use the *Tulip Dimensional Pearl “Ivory” fabric paint to fill in the center of the flowers with a little “dot”. Looks like a pearl.
Stars
Free hand these (7) – using the *Tulip Dimensional Pearl “Ivory” colored fabric paint. Base – paint 4 “V”s – (top, bottom, & two sides) connecting them, leave unpainted in the center of the base shape. Allow to dry. Overlap with more “V”s – going in-between the base star shape. Paint an open circle in the center, and fill in around the circle – leave circle open. Don’t get paint into the base part of the star.
Crown
Use *Tulip Dimensional Pearl “Antique Gold” fabric paint to outline “feather” section of crown. When dry, fill in with *Tulip Glitter 3D Paint “Champagne”. Outline the base of the crown with *Scribbles 3D “Glittering Silver” paint. Allow to dry. Fill in with *Scribbles 3D “Iridescent Silver”. Then using a toothpick, make scribbles over the Iridescent Silver using drops of the *Scribbles 3D “Glittering Silver”.
Fill in diamond shape at the front center/bottom of crown with *Scribbles 3D “Iridescent Silver”. Paint small tree with *Tulip Dimensional Pearl “Ivory” fabric paint.
Optional – Sewing the banner together
After completely dry, put the front and back together (right sides facing each other), cut out the scallops for the top, stitch – scallops (leave 4 hanging sections open) and the outer edges of banner (leave a small side opening to turn it right side out). Turn banner right side out, and edge stitch around the outside (about 1/4 inch allowance) – leaving the top unstitched. Make 4 hanging tabs, out of the same banner fabric. Stitch down the side of these, making them the width you need to fit the banner. Turn hangers right side out, iron flat, and fold over to form a loop. Turn banner fabric inwards, where the hangers should go. Tuck 4 hanger pieces in place, leaving enough of the loop out to hang on a rod, and edge-stitch the top. Be sure to catch the hangers in upper edge stitching.
If only using one piece of fabric: fold over & iron edges to finish. Glue edges in place. Ironable hem tape can also be used to finish edges. Glue ribbon pieces for the hangers onto the back of the banner.
Carefully (avoiding painted sections) iron banner, to remove wrinkles.
Bottom Interweaving & Edge Border
This is the most challenging part, but one of my favorites! Mix three paints to get a dark champagne color (*Scribbles 3D – Shiny Butterscotch – 1/4, Iridescent Brown – 1/4, & Iridescent Gold – 2/4). Put in small squeeze bottle with a tiny, pointed, tip. Mix thoroughly! Worth repeating – mix thoroughly!!
Outline and fill in the pattern. Work on this a little at a time, allowing portions to dry before moving on. To make the interwovenness of the pattern detailed, stop just short of where it goes underneath. Then, when overlapping the same area, with the paint (where it crosses over), make the line a little heavier – so it really stands out.
Take the border up the sides using the same custom mixed paint. Add the two diamond shaped patterns on the top, between the two outer scallops. Set the whole thing flat on a table to dry.
When dry, hang on a sturdy stick or dowel rod (which can also be painted in a white/silver color to match), then hang on the wall in a prominent spot. Enjoy!
Article and photos submitted by:
Barbara Schaerfl (Celt) – New Mexico – USA

1 Comment
Thanks so much for this! I’ve already made Arwen’s dress and crown. This will complete my cosplay perfectly!
https://www.facebook.com/pg/finalfantasycosplayjulie/photos/?tab=album&album_id=1273617066037755