


Costumes: Laitaine_Hinnim’s Sewing Without Patterns Course
Contents
Sewing Without Patterns 1 – How to Make a Basic Tunic
Sewing Without Patterns 2 – How to Make Drawstring Pants
Sewing Without Patterns 3 – Tabards and Pouches
I learned this from the SCA booklet “Forward Into the Past”. It was the first sewing project I ever dared attempt and easily the pattern I use most. I think that with a little practice at this design you’ll find yourself much more confident with sewing in no time.
Start with a piece of fabric, either 60″ wide or two 45″ lengths sewn together. Its length should be equal to double the length you want the finished tunic to be, plus a couple inches for seam allowance.
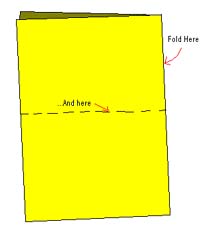
Fold it in half lengthwise so that it’s wrong-side out. Then fold it in half widthwise, so that you have folds at the right side and at the top.
(see Figure 1, left)
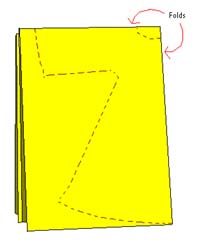
The best way to assure that the tunic will fit you correctly, is to get one of your comfiest-fitting shirts. Take the shirt, and lay it on top of the fabric so that the upper-right corner of the fabric is about in the middle of the collar, and that the sleeve is even with the top fold. You’ll notice that the rest of the shirt comes out at an angle, rather than straight up and down.
With a piece of taylor’s chalk or even a washable marker (if the fabric is washable), trace on the fabric along the outside of the shirt. Come out about an inch from the shirt, for seam allowance. When measuring the collar, start at what would seem way too small and cut a little bit more as you go until you get the right width. It’s much easier to make the collar wider than narrower!
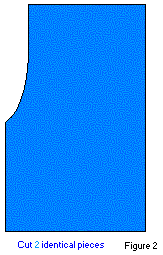
Make the bottom of the tunic curved slightly. This adds fullness and uniformity (see Figure 2, right).
Cut the tunic out along the lines you’ve drawn.
Remember: Measure Twice, Cut Once!
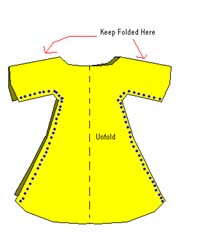
Unfold the tunic as shown in Figure 3, left. Sew where indicated by the blue dotted lines, about a half inch to an inch in.
Make sure the tunic is still wrong-side out!
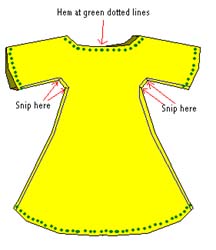
Hem the tunic at the green dotted lines, as shown in Figure 4, right. Roll the fabric over, then over once more, so that the frayed edges are now covered. Sew to hem.
At the armpits, where the seams changed direction, snip the fabric where indicated but
do not cut your seam! This is to allow your arms to reach up without tearing the fabric when the tunic is worn.
Now you’re almost done!
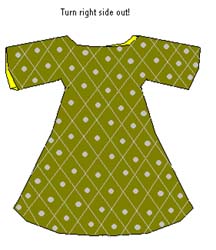
Now turn the tunic so that it’s right-side out. It is now ready to be worn as it is, or you can add trim or embroidery or beadwork or whatever adornments you may wish.

Variations: Tunic may be lenthened or shortened. Sleeves can be elongated or shortened, or cut so that they droop down to the floor. Zig-zags or different dagged edges can be cut at the bottom and/or cuffs. Collar can be rounded, squared, or have a slit cut down the front for lacing. Draw these variations on the fabric before cutting. One tunic can be worn over a longer one.
This can really be used for a number of styles, so let your imagination be your guide!
Next: How to Make Drawstring Pants
How to Make Drawstring “Poofy” Pants
This is of a slightly higher skill level than the tunic; but not really by much. A little bit of sewing experience would be helpful to have when making these, but I don’t think it’s absolutely necessary.
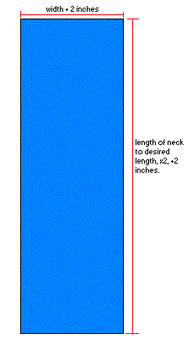
The first thing you need to do is measure. You’ll see that Figure 1 gives several different measurements, each marked with a letter. Here’s how you find each measurement:
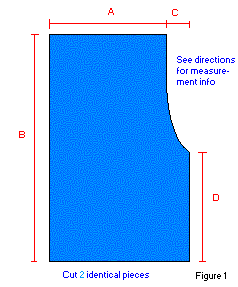
A. Measure your waist. Divide the number (in inches) by 4. Then add 2. This is the LOWEST number that A can be. It can be as much bigger than that as you want: the higher the number, the puffier the pants will be.
B. Measure the length, from the waist down, that you want the pants to be. Add 5 to that number.
C. About 2 inches in. Make sure: A is the measurement after cutting for measurement C! In other words, the number you came up with for A is the distance from the corner of the fabric to the beginning of C.
D. The distance from the crotch of the pants to the point where B ends. The crotch of the pants will be several inches below your actual crotch.
Remember: Measure twice, cut once!
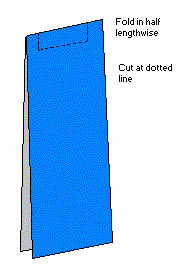
Cut a total of four pieces of fabric, observing these measurements. Two will have the curved cut on one side and two will have them on the other, as shown in Figures 1 and 2.
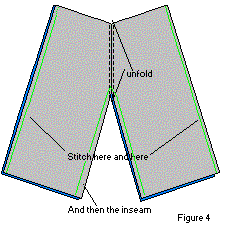
So now, you have 2 pieces of fabric. Unfold them both. Lay one, wrong side up; on top of the other, wrong side down. The pieces will not lie as flat and even as the diagram! Line up the outer edges and sew a 3/4 inch seam on each.
Then line up the inseam and sew, in one continuous line, a 3/4 inch seam. Start at the bottom of one leg and curve around to the bottom of the other leg. See Figure 3.
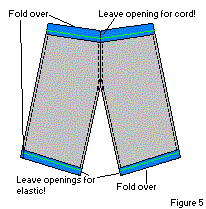
Fold the waistline down 1/2 inch and iron. Then fold it down 2 inches and iron again. Stitch along the very bottom of this part of the fabric but leave a gap of about an inch at the front center, because this is where you’ll be putting your drawstring. See Figure 4.
Do the same with both of the legs.
Now it’s time to do a bit more measuring, this time with the cording and the elastic. The cord is going to tie around the waist, and the elastic will go on the ankles. So take your cord, put it around your waist (where you want the pants to come up to), and tie it in a knot and bow as if it were a sweatpants string. That’s how much cord you’ll need; cut accordingly.
Then take some 1/2 inch wide elastic and put it around your ankles (or where the bottoms of the pants will go). Do not stretch the elastic when you’re doing this! Then add another inch total, and cut.
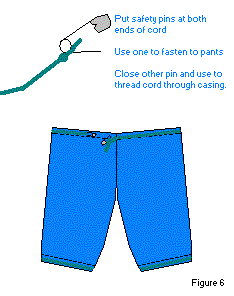
Now it’s time to run the cord and elastic through the pants, as seen in Figure 6. Take two safety pins and attach one to each end of the cord. You may have to tie knots in the cord and that’s fine. Use one pin to secure the end of the cord to the fabric. This will keep it from disappearing into the fold of fabric you made (called a casing). Close the safety pin at the other end and stick it into the opoening of the casing.
Work the cording around the waistline by scrunching up the fabric all around it every few inches. Then grab the safety pin from outside of the casing (you’ll feel it through the fabric) and hold onto it while straightening out the fabric behind where you’re holding the pin. This is a long process, especially when you’re new at this. It’s a good thing to do while watching TV or waiting for dinner to cook. Or both. Finally work the pin out of the opening when it’s gone all the way around. Pull the ends of the cord to even them up. You might want to tie them now so they don’t get lost in the casing. Remove the safety pins.
Next do the same with each ankle, with each piece of elastic. When you’ve gone all the way around, hand-stitch the ends of the elastic together.
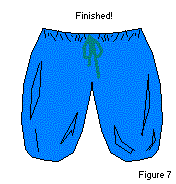
Having more fabric than cord and elastic is what makes the fabric bunch up and create the “puffy” effect. Turn the pants right-side out and they’re ready for wear!
The whole process takes a few hours to complete, less time once you get the hang of it.
Variations: Alter the length of the pants by cutting them longer or shorter. Alter the puffiness of the pants by making the waist and ankles wider or narrower. You could make one leg one color and the other another color; this was very common in the Middle Ages and Renaissance. You might add beaded trim or bells to the ankles; do this before adding the elastic.
Next: How to Make Tabards and Pouches
By now you’ve learned how to make a tunic (which can be elongated and altered to become a dress or robe) and a pair of drawstring pants (which can be long pants or short breeches). This time, we’ll be making a couple simple accessories: a tabard, which is a sleeveless overgarment, and a quick and easy belt pouch.

Begin the tabard by measuring from the tops of your shoulders to the length you want it to be. Traditionally, they’d usually go to knees or lower; some, however, were just about the same length as the tunic.
Take the number of your measurement and multiply it by 2. For example, if the length is 48 inches (4 ft.) then the number you get is 96 inches (8 feet). Add a couple inches for hem allowance.
Next, measure how wide you want the tabard to be. It might be so narrow that it’s only a foot of fabric in the front and in the back, which looks especially nice with dresses. Or it may be broader than your shoulders, like a knight’s tabard may be when worn over armor. Whatever width you prefer, add a couple inches again for hem allowance. See left.
Cut your fabric to the appropriate length and width. And as always, measure twice, cut once!
Take the piece of fabric you just cut out, and fold it in half the long way. Now cut out a rectangular piece for the head hole. Note that the easiest way to make it symetrical is to fold it in half again, the wide way. You know, like cutting out paper hearts!
The head hole can be low or high, narrow or wide, depending on your own preference.
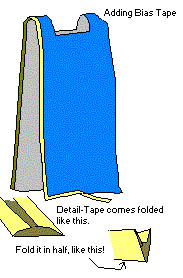
Next we hem up the sides and bottom. But there’s something that’s even quicker and easier than hemming! It’s this wonderful stuff called bias tape. Unlike the name suggests, it’s not sticky. It’s almost more like ribbon than tape. Just about any fabric store carries it.
Add bias tape according to the diagram below. Fold it in half over the edges of the tabard and pin it to keep it in place. Then, just sew it on.
Once all the bias tape is added, to the outside of the tabard and the neck hole, it’s done and ready to wear!
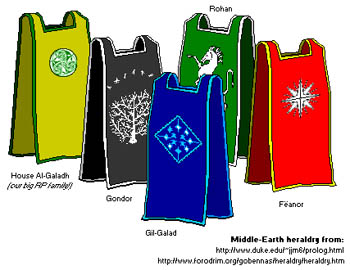
Tabards were often used to display heraldry. You might see them on soldiers, knights, heralds, castle guards, servants, and even on royalty.
There are a few ways to add heraldry to your own tabard. You might:
* Print out a design in reverse and iron it on
* Embroider, if you’re particularly ambitious
* Cut an emblem from felt and glue or sew into place
* Use fabric paint to paint an emblem on
Below are some examples of decorated tabards.
Next we’ll make a nice, simple pouch. It’s so easy, in fact, that it only needs one diagram!
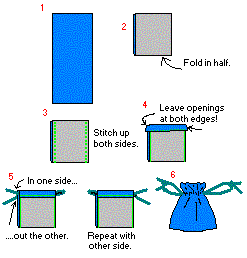
1. Cut out a rectangle of fabric.
2. Fold it in half, wrong side out.
3. Stitch up the sides.
4. Fold the top over a half inch, then fold it over again an inch and a half or two inches (depending on size). Stitch it mostly into place, but leave a gap at each side for cord.
5. Using the methods described when making the drawstring pants, take a bit of cord and stick it into the left side. Work it all the way around until it comes back out at the left side. Tie the ends into a knot.
Repeat for the right side.
6. Turn your finished pouch right-side out!

2 Comments
… [Trackback]
[…] Read More: councilofelrond.com/craft/costumes-laitaine_hinnims-sewing-without-patterns-course/ […]
[…] I know more than I did back then, of course (like how to use Photoshop…) but I think that the tutorials really have stood the test of time, and can be of use to first-time garbers even now. Have a look for yourself! […]