


Gardens of Valinor: Estë’s Sanctuary ~ Building a Waterfall Pond
“From the fountains of Irmo and Estë all those who dwell in Valinor draw refreshment; and often the Valar come themselves to Lorien and there find repose and easing of the burden of Arda.”
~ from The Silmarillion – Valaquenta

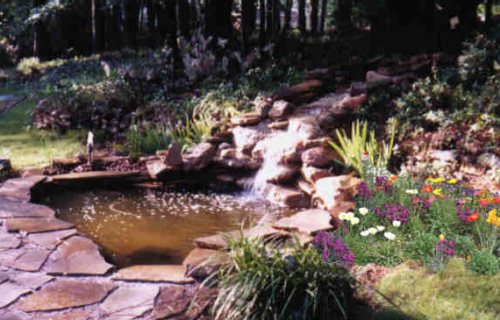
One of the most relaxing sounds in nature is the sound of running water. Nothing is more peaceful than sitting beside a babbling brook and listening to the sounds of nature. The addition of a waterfall helps add to the ambience and tranquility of your garden, and attracts local wildlife.
BASIC MATERIALS:
Liners:
There are two types of liners you can use. There are pre-formed fiberglass liners in many shapes and sizes. Some can be very expensive. You can also find flat liners which you purchase by the square foot, and runs about $1.00 per sq. ft.
Pumps:
I recommend going to your local lawn and garden store and tell them the approximant size of your pond, and the amount of flow you want. You will need to get the appropriate tubing. To figure out the size of your pond, measure the length times width, times depth. Don’t worry about the curves of the pond, just use the widest points.
Rock:
You can use rock which you have collected or purchase it at a garden store. Rock comes in a wide variety of colors and textures. Also, call around to get the best price, as rock can be costly.
Mortar:
You will want to get a good quality pre-mixed mortar for your waterfall. Sometimes you can also find mortar with a color similar to the type of rock you have decided on.
Sand and Gravel:
You will need to place sand under your liner to keep it stable and from ripping. Gravel is needed to place inside the pond for appearance.
CONSTRUCTION:
Step 1: Location
Deciding where you want your pond and the size of the waterfall is very important. It is recommended not to place the pond next to or under a tree, for doing so may make installation and maintenance difficult. Also make sure the pond will not collect falling pine needles, as pine needles can poison the water. Black walnut trees are also known to be poisonous. If runoff is a potential problem, design the pond so that it has raised areas, landscaping, or drainage, and avoid areas that retain water. Take into consideration the amount of sunlight the area receives, generally six to eight hours a day is best.
Take stakes and twine to rope off the area that you will use. If you would like to include fish, you must find out what the freeze depth is in your area. Call a local plumbing company for this information. You should dig at least two feet deeper than the freeze line.
Caution! Always check with your utility company before digging. They will come out and mark any underground pipes or wires for you.
Step 2: Preparing the Pond
When you dig your pond, round the bottom if you are using a flat liner. Line the bottom with sand and pack firmly. Place liner over pond area and push down. Place rocks around edge to secure it. If you have to walk on the liner, take your shoes off so that you don’t poke holes in it. If you use a pre-formed liner shape the bottom so that the liner fits snugly. Place a thin layer of sand underneath and around the sides to fill any gaps.
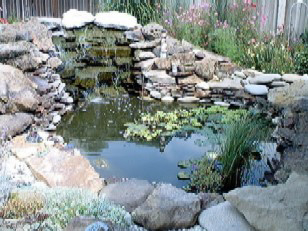
Step 3: Building the Waterfall
When building your waterfall keep these things in mind … Waterfalls are narrow on the top and wider at the bottom. Make sure the rocks angle slightly towards the pond, around 15 degrees. I suggest you place the rocks in different formations before you decide on a final form. Once you have picked a design, place the rocks in layers and mortar, slowly building them up. Near the top, place the tubing from the pump where you want the water to flow from. Make sure you smooth the mortar between the joints.
Step 4: Installation of the Pump
Depending on what kind of pump you have purchased, follow the manufacturer’s installation instructions. I would suggest that you have a licensed electrician wire the pump if it is not a plug-in model.
Step 5: Lighting
There are many styles of outdoor lighting you can use. Small solar spotlights are what I used. They are fairly inexpensive and basically pay for themselves and also very easy to conceal.
Step 6: Decorating
Place gravel in the bottom of the pond. You can also place larger rocks in once you have done this. Your pond may be a little murky for a few days until everything settles.
Now all you have to do is decide which plants to place around or in your pond, depending on where you live and what styles you prefer.
You may also want to include fish in your pond. I have found that Koi live very well in garden ponds. The waterfall aerates the pond very nicely. Don’t forget to feed them! A small pond usually does not have enough food for them.
I hope this guide has been informative and helpful. Enjoy your garden waterfall!

~ Arathorn2112
