


Rohan: Meduseld Decorating
~ Faramirs_first_kiss
The most prominent features of the gloriously decorated Golden Hall of Edoras are the raised golden designs that cover the walls, and they’re really easy to reproduce to decorate your bedroom, schoolbook, clock, you name it. Some people might have the skill and equipment needed to make these designs out of wood but I expect most of you don’t, so here’s my simple guide to make them using cheap, easy to work with and readily available materials.
You will need
- Thick corrugated cardboard
- Newspaper or thin white paper
- Tissue paper
- PVA glue
- Masking tape
- Gold paint
Firstly you need to find a design that you will use. If you’re lucky enough to have the Two Towers extended DVD then you’ll find loads of suitable designs and if not don’t worry, they are all over the internet. A good site to start from is Alleycatscratch which has a lot of pictures of the banners or you can search around for pictures of the walls of Meduseld. Be warned, though, if you want to take a pattern that covers a large section of the walls you might have to piece together two or more pictures together, because most of the ones on the web are more interested in the characters than the architecture and as a result don’t show the whole thing. Alternatively you could take your own screencaps, although you may still need more than one to see an entire design.
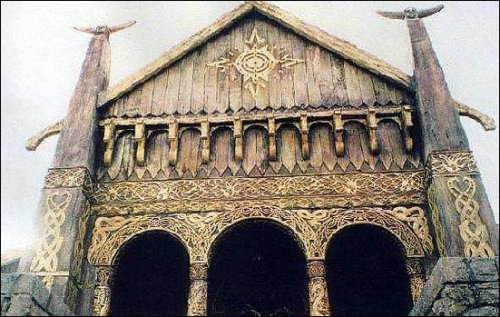
There are three different types of decorative motifs used in Rohan which are, in increasing order of difficulty to make, block images, large interweaving patterns and knotwork. The first are mostly the horse and sun images that are the most recognisable part of Rohirric design, the second are like the patterns on the pillars outside Meduseld and the third is like the pattern in the background when Gríma and Éowyn are talking. (See examples in pictures below.) Once you have your design, either draw it onto the cardboard or print it out the size you want to make it and then stick that down onto the card.
To make a block image, cut out each section of the image from cardboard using scissors or a sharp knife and neaten the edges as much as you can. If you drew them as they would appear then you can use the ripples in the cardboard like the grain in the wood. Mix some water with the same amount of PVA glue and dip strips of newspaper or thin white paper into it then lay them around the sections, paying close attention to the edges. The moisture should weaken the card and make it easy to round the edges slightly to make it look like it’s been carved from wood. Leave that over night to dry in a warm place on a wire rack, or devise some other way of keeping it from sticking. If you can’t find a way, you might have to do it in sections. It won’t make any difference to the finished product but it’ll take a little longer. Keep adding layers like this until it’s pretty solid. It might only take one layer especially if you’re using printer paper since it won’t really have to stand up to too much pressure, but make sure the corrugated edges are properly covered so you can’t tell it’s made out of cardboard. Then add another layer in the same way, but this time use tissue paper. This does several things: it strengthens the shape a little more, it helps to hide anything printed on the lower layers and it makes little wrinkles that look like wood grain, so lay the strips all in the same direction as the lines in the card, if they’re still visible. Leave that to dry and then paint with antique gold paint.
To make a large interweaving pattern, draw the pattern out on the cardboard as before. Now take either folded up newspaper or cut more bits of cardboard to the right shape and glue them on top so it looks like they’re overlapping, like this:

You can cut out the bits of the base where there is no pattern if you want whatever the pattern will be attached to to show through. Next cover the pattern with layers of paper and then tissue paper like with the block patterns and paint it. If you didn’t cut out the places where there isn’t any pattern, paint the gap brown to look like wood.
To make knotwork, begin once again by drawing the pattern onto cardboard. You can cut out the gaps again like above but it’s a lot trickier to do with small, fiddly gaps. Then tape sausages of rolled up newspaper to the cardboard like above to make it look like the threads weave under and over each other and cover it with layers of paper just like before. Make sure you push the wet paper right into the gaps or it will look odd when it dries. Lastly paint it as before with brown in the gaps, taking care not to go over the edges.
You can stick them to a wall with bluetack or hang them up with string by making a few holes in them, or you could make mini patterns using thinner cardboard and use sticky back plastic or just clear tape to attach them to the front of books or files.
Here are some examples for Meduseld Decorating inspiration …


1 Comment
Awesome! Thanks for sharing this with us! Thought that Meduseld was one of the betetr props in the movies.
http://arwen-undomiel.com/forum/