


Stuck on Lord of the Rings
Charis shows you how to make Middle-earth magnets, and some easy bookmarks, too!
I absolutely love Lord of the Rings and would love to purchase tons of LotR merchandise. However, I am a grad student, and if you are a student of any type you know one thing for sure: You are poor! So, when you must, make your own LotR products!
I decided to make magnet and bookmark sets for my friends as gifts. I promise, these are easy and cheap to make… and they look good, too!
Magnets
Step 1: Pick a picture you wish to use. This can come from absolutely anywhere, even printed off the Net. However, magazine pictures or the like will look better. I used pictures from the Fellowship of the Ring daily calendar I received last year for
Christmas.
Step 2: Cut down the pictures to the size you want for your magnet. The magnets can be any size, from very small to enormous.
Step 3: Laminate your pictures. There are many places that will laminate depending on where you are located. I live in the US and some of the places you can laminate things are Staples, Kinko’s and Mardel. Don’t forget to cut your pictures out of the lamination!
Step 4: Buy magnetic sticky back sheets. These come in various sizes and can be found at any craft store. I bought a 2′ roll since I was making several magnets.
Step 5: Peel back the sticky back of the magnetic sheet and stick your laminated pictures onto the magnetic backing. It will stick tight, so align it right the first time. Cut down the magnetic backing so it doesn’t show around the magnet.
Step 6: Enjoy your Middle-earth creation! Stick your favorite pictures of LotR on your refrigerator, in your office, in your locker at school, anywhere!
************************************************************
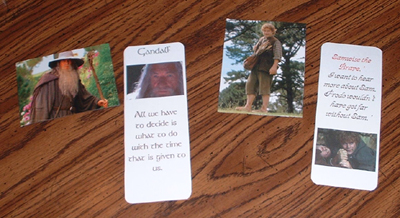
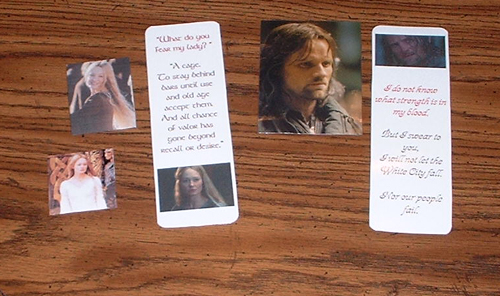
Bookmarks
These require a computer. What follows is adescription of how to make LotR bookmarks using digital images.
Step 1: Open up Microsoft Word or any other word processor.
Step 2: Insert a text box into your document that is the size of the bookmark you want to make. I make mine a little large (2.5″ X 7.5″) because the pictures look better and it gives you more space to work with.
Step 3: In the text box, write your favorite line from the LotR books or movies. You can try different fonts, sizes and colors to see how it looks. I would recommend downloading the LotR fonts Ringbearer and Tolkien to use on your bookmark.
Step 4: Find a digital picture that you like. You can also scan a picture and save it onto your computer to use.
** Admin Note … since this article was published, we now have our very own bookmark download section here.
Step 5: If you have a photo program, size the picture down to fit onto the bookmark. In Microsoft Word, you can size pictures down when you insert them into the text box.
Step 6: Arrange your picture where you want it on the bookmark.
Step 7: Print off your new bookmark on card stock.
Step 8: Here’s the fun part! Cut the book mark out anyway you like. Use decorative cut scissors to make fancy borders, round the corners, cut them down to a new size … The possibilities are endless!
Step 9: Laminate your bookmarks so they look professional and are protected from any water damage.
Step 10: Stick your bookmark in your favorite LotR book and enjoy a night of fun, relaxing reading!
~ Charis
