


The Great Realm of Yavanna Wool-dyeing Experiment
~ LadyAdaneth
Acknowledgements: Laitaine Hinnim, Zoe, Elanor-Goldenhair
Keen to exploit the bounties of our patroness, a few of us Yavannites have been sharing ideas on use of plant materials to dye other natural materials – wool in particular. We have also shared a few ideas on what to do with it after colouring. First things first though….
First hint:
Don’t bother trying to produce your own nettle fibre, it’s a lot of work. Retted it in an old water trough (it happened to be an old pig trough, quite a smell, but anyhow…) then dried the retted canes out, scrunched them with a mallet, and pulled them through wool combs. Got very little fibre for all the effort. Considering you can now get 1/2 pound of hemp for 6 bucks on E-bay to spin Better to compost the nettles and encourage the rest of the garden instead.

Preparation
First spin your yarn (you could dye unspun but most materials spin better before processing).
Wool will need to be washed before dyeing to remove the natural greases.
Mordants
For some colours with some plants you need a mordant/mordaunt to fix the colour in. A number of chemicals have been in use for many years, and can contribute to stronger and/or different colours. However there are a few environmental and safety considerations here:
1. If you want to use a chemical mordant you could reduce environmental impact by evaporating off the water to recrystallise after first use, then you could reuse next time (rather than throwing out the mixture)
2. Always avoid contact with the solutions – you wouldn’t want green and orange hands anyway, but also avoid breathing in any possible fumes. Use even the common food ingredients with great care as they will be in larger quantities/concentrations than normal.
A common mordant is Alum. You can also use vinegar; baking soda; tartaric acid; common salt is also possible.
Copperas is ferrous sulphate or green vitriol. Chrome is potassium or sodium dichromate (NB fumes may not be good for the lungs).
Iron water: using iron as a mordant darkens whatever color is used, but it can’t be combined with anything else. A bit of information on preparing iron water too – in the American Colonial period, women would probably use rusty nails!
** Note advice from Zoe: I would advise against using chrome, tin, or copper for mordants. They’re very bad for the lungs. I used to use chrome (it’s an orange crystalline powder which cannot be exposed to sunlight) and I found it didn’t do much for making things redder and it actually made the wool feel gummy. I find alum or vinegar does the trick with most natural dyes.
How to mordant:
Normally just soak your fibre in a solution of the relevant chemical for a few hours/overnight and dry off before dyeing with the exception of chrome where you go straight into dyeing.
Now you are ready for the next stage:
Plants for black dye on wool.
- Plant Mordant
- English Oak (Quercus robur) Copperas
- Flowering ash (Fraxinus ornus) Copperas
- Barberry leaves (Berberis vulgaris) Copperas
- Yellow dock root (Rumex crispus) Chrome
- Valley Oak (Quercus lobata) Iron water
- Meadowsweet root None needed
- Common plum (Prunus domestica) Copperas
- *Logwood (Haematoxylon campeachianum) Iron Water
* (Mrs Grieves’ “Modern Herbal” (1936!) says that in the Thirties Logwood was still being extensively imported into the UK for commercial dyeing. It is a tree from the Tropical Americas and hence probably an unecological hardwood but you may be able to get chips from your specialist supplier link. It seems the chips have to be fermented first to extract the colourant. If unfermented there are medicinal uses for the bark so treat with caution!)
Use bark unless specified otherwise.
Chop up 1lb/half kilo bark, steeping overnight in cold water to just cover, then boiling for half to 2 hours depending on how easily the dye comes out. Strain out the plants. You can apparently add up to 4 gallons/20 litres water but this may depend on how dark you want your dye. You want the mixture lukewarm when you add your mordanted wool. (Simmer in relevant chemical solution eg 1oz/30g to 4gallons/20litres water for an hour.) Make sure all parts of the wool are coated in dye then raise the temp to boiling for 30 mins or more if need deeper colour. Rinse very thoroughly, squeeze out gently and roll in old towels before hanging to dry.
Everything we have ever read on this, plus combined practical experience, suggests that this is not an exact science and you should keep notes of what you do but feel free to experiment! That’s what we’re doing!
Other Colours
Here’s what Laitaine Hinnim’s got to work with so far:
- Goldenrod
- Blueberries
- unidentified “black stickyberries”
- unidentified red berries (may be chokecherries, not sure)
- Turmeric
- Pickled Beets (going to use the juice)
- Privet leaves (haven’t aquired yet; have to go get it, it’s waiting for me at a friend’s house)
- Tarragon (just ’cause I’m curious)
- Black Tea
Blueberries in vinegar and salt make a really cool purple/blue/gray color.
And Zoe:
Dock (Rumex) roots are good for dyeing. The plants have large, carrot like taproots. You just boil them up and put the wool in. The roots have so much oxalic acid it acts as a mordent. Get orangey-yellows.
We’re hoping for more infor about Scandinavian lichen dyeing. You can get all the reds, pinks, purples, and mauves from fermenting lichens in ammonia (pure ammonia, not sudsy cleaning ammonia). Apparently.
Check out e-Bay for deals on natural dyes such as indigo, madder, and brazilwood.
LadyAdaneth:
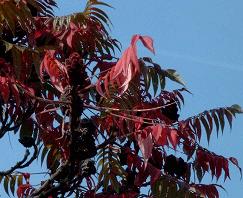
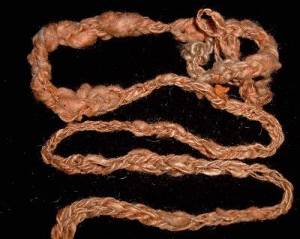
I made up a brew of sumac (Rhus spp) leaves and chopped up roots, which my book suggested would give oranges through browns without mordanting. I have one of these trees in the garden and the leaves are just taking on their fabulous Autumn colour. The dye solution looked a lovely orangey-red, but the yarn has come out more of a pale warm brown – this after about 30 mins simmering and a few hours sat in the cooling solution. It’s not a wildly exciting colour given the effort I put into the spinning! I wonder whether a mordant would help. Again, any suggestions very welcome. Still, it’s quite an interesting textured yarn so I reckon I can make it up into a piece to decorate a bag or something.
Elanor-Goldenhair:
Kool-Aid! For anyone not in the USA, this is a fruit drink mix which comes in various colours – sorry flavours, and stains like mad. Add half a cup/4 fl oz. vinegar to the diluted mixture to act as a mordant. For UK residents – Ribena would probably be similarly effective.
Health and Safety
A lot of these “natural” dyes also have medicinal activity, so you’d want to avoid skin/mouth/eye contact. In any case, unless you are going for the green and purple skin look, you would do this…
- When a package of loose wool at the craft store says “mandala wool” on the label, it apparently doesn’t mean wool.
- When so-called “wool” is actually made out of some obscure synthetic material, it melts into a completely useless glob while being dyed. And smells bad in the process.
- Try Orvus paste to degrease wool before dyeing.
More natural wool colours!
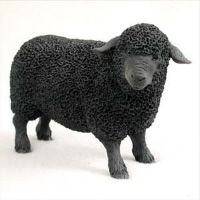
You’re definitely right about the black sheep. Jacob’s sheep wool is great as you get a brown/black and white mixture. Young Herdwick sheep produce dark grey. And you can get a really beautiful brown Alpaca. You get many shades of brown/grey from Romney sheep. Hamlet the Ram got his first shearing last month and the fleece is about 95% black brown with 5% silver grey speckle hairs. Could just overdye that with some walnut or oak to make dark black. Othello is silver, Ebony is, well, polka dotted but generally mid gray-brown.
One of us also has one ewe who is half Romney and black.
OK, now we have some wool (or other fibres) in attractive shades. Well, different from what we started with at least. What to do now? Here are some ideas.
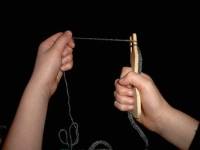
The Lucet
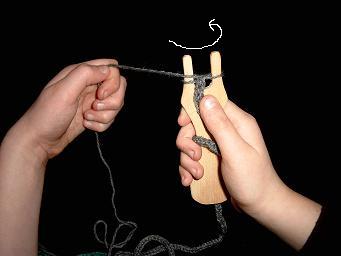
Have you ever wondered how the inhabitants of Middle Earth fastened their clothes in an age before zippers and hooks & eyes? Of course buttons are mentioned (especially Bilbo’s lovely brass waistcoat buttons which he lost in the Misty Mountains) and we know about the leaf-shaped brooches of Lorien. However, it is likely that they also made use of square cords made using a “Lucet”. Lucets are known to have been used across Europe from fairly early times more-or-less until machine-made ribbons became commonly available. They have certainly been found in Viking archaeological sites. Lucet cord is strong and quite stretchy so ideal for fastening clothes where a bit of give makes for a lot more comfort.

As you can see from the pictures, a Lucet is quite a simple design (although of course amenable to all sorts of decoration if desired.) If you can’t find a place to buy one, try carving one yourself, maybe smooth off a forked twig, or hammer a couple of smooth headless nails into a piece of wood. You may also be able to improvise with a commercial “French knitting” kit using only 2 pegs.


If you use yarn you have spun yourself, you can get a nice slubby effect more suitable for artistic decoration of bags and so on. If you have dyed some commercially spun yarn (or are a lot better than me at spinning!) you can produce a very even, square cord suitable for lacing bodices, attaching trousers to jerkins, and all sorts of other uses.

Of course if you don’t want to indulge in Middle-Earth fashion design, you could also crochet the cord into mats, use it to trim cushions or bags, or all sorts of other things.

One additional advantage of the lucet is that airlines don’t mind you carrying one on board – this has helped me while away many a trip and I am building up a collection of cords ready for further projects …

Thanks to my son, Galuverior, for the loan of his hands to demonstrate the technique. From an initial slip-knot loop around one of the pins, you simply turn the lucet to create another loop on the other pin; turn again to loop round the first pin above the first loop; slip the lower loop over the upper; turn again to create a loop on the second pin; slip the lower loop over the upper; carry on until out of yarn or your plane lands. You may want to give a gentle tug on the yarn between turns to give a firmer cord and keep a nice even tension.
Try these links if you would like more information or want to buy a really fancy lucet (not necessary but nice to look at!).
