


Middle Earth: Easy Woven Pillows and Placemats
Tools and Equipment Needed
- Small hammer
- Finishing nails
- Wooden picture frame, OR, 1.5”x1.5” pieces of wood to make a frame
- Wool (either cotton or the real thing) in colours that make you happy, OR, Raffia and dry natural materials (such as grass, birch bark, twigs, etc)-> NEVER take birch bark off of a live tree! You need your skin to live, too!
- Large tapestry needle
- Large-tined dinner fork
Terms
Warp … the long threads that run the length of the frame
Weft … the materials woven onto the warp
Draw-in … edges of the piece being narrower in the middle than the end/s
Beat … push the fibres up the warp until they run evenly across and have less space between them
The elves were well known for their weaving ability, especially the Noldor, and the hobbits and men also practice this ancient art. A good way for you to start learning is by making your own pillow or placemat.
To get started you need an old wooden picture frame (fairly hefty one), or make yourself a frame out of wood, whichever you feel most comfortable with. Remember, the size of the frame will dictate the size of your finished piece.
Hammer in finishing nails at equidistant points across two opposite ends of your frame. Make sure that they are about 4”/2cm apart. If you make it any wider then your weave will be too loose. You can make it less if you like, but then only the colour you have chosen for your warp will show. This is fine if you are making stripes. If you are making a frame please make sure that the nails are placed on the upper sides for ease of weaving.
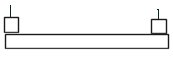
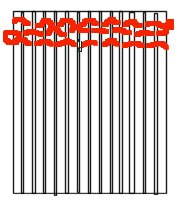
Measure out enough lengths of wool or raffia for each pair of nails on your frame. Leave enough to tie secure knots with tails. Do not make the warp too tight or you will have trouble weaving your weft in. When you tie on your warp make sure that all the wool/raffia is pushed down to the bottom of the nails so that your warp is nice and even across the top.
How to Weave
The first weave you should learn is the ‘basket weave’. It consists of going over and under alternating strings in the warp. The first line goes over-under-over-under (etc) until you hit the end. Then loop the wool around and do it the opposite way on the return side: under-over-under-over. Start simple. Believe me, you’ll need to for the first little while.
Thread an arms-length of wool onto your tapestry needle. This will be just like hand sewing, but larger. Leave a good tail on your wool at the beginning of the weave if you are making your project entirely out of wool. It won’t show when you sew the edges together to make a pillow, and you can weave it down the edge for placemats.
As you go you will run out of wool. This is okay, even if you run out in the middle of the warp. Just start a new piece overlapping the one which ran out and continue on.
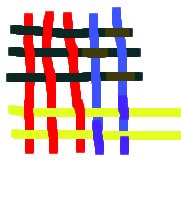
For variety you can have different coloured wool/raffia for your warp and weft. Even groupings will make a more regular appearance, odd groupings will have a more random effect.
This is how stripes, checks and tartans are made. Also, you can choose different types of wool for varying effects, but for your first project choose something that is easy to deal with and uniform so you don’t have to worry about weird lumpy bits in your weaving. Concentrate on getting an even texture from top to bottom. Obviously this doesn’t apply to found item natual weaves. It will always be lumpy, and that’s okay. Just make sure that the lumps aren’t big enough to make your soup bowl or plate dump.
To help you have a nice, even texture you will need to ‘beat’ your warp. Take your fork and push the weft gently up until it either touches or almost touches the last pass you made. If you make it very tight only the weft will show and if you make it looser the warp will also show. Don’t make it too loose or your pillow stuffing will fall out, and don’t make it too tight or the finished cloth will be very stiff and hard to work with.
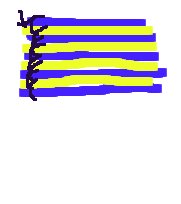
One problem that all weavers encounter is something called ‘draw in’. This means that the middle and end of your piece are not as wide across as the beginning. It happens to everyone, but the best way to avoid it is not to pull your wool too tightly from side to side as you weave. If you are making a placemat out of natural found items then this likely won’t be an issue, as they probably won’t be long enough to pull much on the sides of the piece. Keep it in mind, though, as you go.
To make your life easier don’t start at the very top of your frame and don’t weave to the very bottom. You can always push the fibres into place with your fork to keep them looking nice, and friction keeps everything in place afterwards.
Taking your piece off your frame
Undo your knots holding your warp to the frame. Hopefully you have left enough end length to tie 2-4 strands of wool/raffia together to make a nice knotted fringe at each end. If you have not, then take your tapestry needle and thread it with an inconspicuously coloured thread. Sew the edges fairly tightly, and then loop over the ends to the side that will be the inside of your pillow and sew back up again.
This will obviously NOT work for raffia, so MAKE SURE you leave enough length.
NOTE: If you are making a pillow you will have to have two sides, so you’ll have to do this twice! For placemats you can make as many as your heart desires.
Making your pillow
Put your front and back pieces together with the outside facing in. Sew three and a half edges with your tapestry needle and some leftover wool. Leave one half of an edge open to turn your work back out. Push your pillow stuffing in through the last open place and sew it closed with more leftover wool. If you are leaving a fringe on your pillow keep this in mind when you have your pillow turned inside out for the first edge-sewing. (ie. Turn the fringe to the inside before you sew as well)
~ Saelwen_Silivren
