


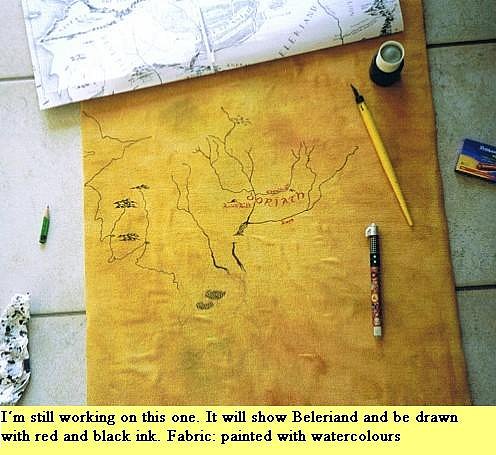
Middle-earth Map on Fabric
What you will need:
1) Fabric
- in a light colour / pastel colour like yellow or pink, but white works best (I did it with an old pink sheet of my bed)
- it should have the right thickness (rather thin, not too thick) and an acceptable surface (not too soft or cosy, not too synthetic or smooth, maybe a bit rough)
- e.g.: a sheet, fabric from a T-shirt or something similiar
- must not soak up too much water, but must still be receptive for it
2) A board
- out of wood or anything strong
- you fix the fabric on it
- size: almost the same as your piece of fabric
3) A pattern of the map you want to draw.
I copied the Beleriand map of the Silmarillion until it had the size I wanted. Out of two 19×12 cm pages in the book I made four pieces in A4 format.
4) A pattern of a special font you want to use for the writing (see fonts on CoE here so that your map looks more real and middle-earth-like)
5) Paint to dye the fabric
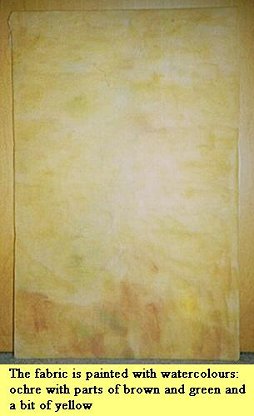
- watercolours in ochre or brown, perhaps mixed with yellow, orange, a bit of red or very little bit of green – you will get a more intensive colour
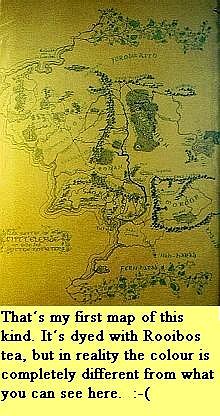
- OR: you can use Rooibos tea that dyes quite good too (I used it!)
- You will need a bowl then
- You can add a few drops of paint for silk painting in brown, yellow or orange (like I did)
- The fabric gets a brownish colour and compared to the method with watercolours, it will get a more faded colour
6) Liquid glue and water for a glue-water-mix (= g-w-mix)
7) Pencil (a hard one), ruler, paintbrush, fountain pen, ink (in different colors if you like)
8) A staple gun, with which you can fix the fabric to the back of the board (not a ordinary one, but a special one for wood and so)
9) Something to put underneath when applying the glue-water-mix / the watercolors (if you use them) e.g. a huge plastic bag that was cut open, or anything else out of plastic
How ?
Step One – Dying the fabric
The very first step is to choose and measure out the size of your map. Then you cut out a piece of fabric that is ca. 5 – 10 cm (depending on the thickness of the board) wider on each side than the map, because when you cover the board with the fabric you have to fix it at the back of your board and so you will need a larger piece.
Method A) Watercolours
Take the plastic bag (or whatever you want to put underneath) and put the fabric on it. Paint it with the colour you chose. That’s so to say your main colour. It´s not a must to have the same colour shade everywhere. You can also mix in e.g. a bit more red or some less brown at some places. My main colour was ochre and sometimes I added a little bit of green or brown.
But the differences between the colours should not become too visible; otherwise your map will look spotted.
Allow to dry. Outdoors, in the sun and with wind, it won’t take long, at most 2 – 3 hours. If you hung it up somewhere, e.g. clothesline (without any pegs), you should turn it over frequently, so that no lighter stripes or similar things appear. But you can also simply lay it on the ground with the plastic bag, out- or indoors it doesn’t matter. Indoors drying will take twice as long approximately.
After drying you make the glue-water-mix by pouring some glue and an equal part of water into a container. On no account you should take more water than glue, just take an equal part or a little bit less water than glue. Then you apply the mix with the paintbrush to the fabric. That’s important! Because without this mixture the ink will run. Then allow drying again.
(Don’t forget to rinse the paintbrush properly, otherwise it will become stiff so that you have to throw it away.)
Method B) Rooibos Tea
Take the bowl (it has to be big enough for your piece of fabric!), fill it with hot water and put in 2 – 4 teabags of Rooibos tea. Take them out after 5 – 10 minutes that depends on how much water you’re using. Then put in the fabric. You should not fold it; but it should be creased and crinkled, so that the colour can spread out better. You can add a few (5 – 10) drops of paint for silk painting. That works because this silk-painting-paint is liquid enough.
While the fabric lies in the bowl you should stir frequently and test how much it is dyed already. After a few hours, when you think “That’s the right colour” you take it out of the water and let it dry (as described above). Don’t let it remain in the sun too long, otherwise it will be bleached too much.
After drying you make the glue-water-mix by pouring some glue and an equal part of water into a container. On no account you should take more water than glue, just take an equal part or a little bit less water than glue. Then you apply the mix with the paintbrush to the fabric.
That’s important! Because without this mixture the ink will run. Then allow drying again.
(Don’t forget to rinse the paintbrush properly, otherwise it will become stiff so that you have to throw it away.)
Step Two – Fixing the fabric to the board
Take the dyed and dried fabric and lay it on the ground with its front down; on this you lay the board and centre it. Now you put the fabric which juts out under the board around your board and then you fix it with the staple gun (but be careful…!). Pay attention that nothing juts anymore.
Now you have something similar to a canvas, I think.
Step Three – Drawing the map
You have to copy the map of the pattern onto the fabric by hand.
First you pre-draw everything with the pencil, in case of making a mistake. And you also need the ruler. Frequently you should check if you’re not “off course” , so you can avoid mistakes.
You look for striking points and mark them on the map pattern.
The first one should be at the edge. E.g. a coastline:
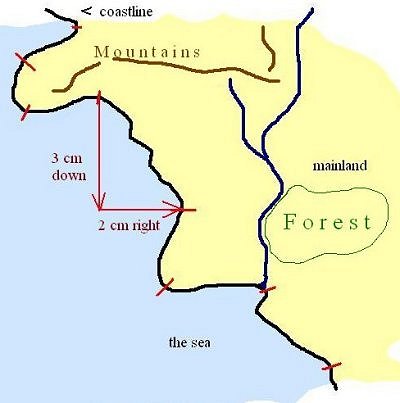
The short red lines are such striking points.
What the arrows mean: You get the distance between two points, by measuring how many centimetres down/up and how many centimetres right/left you have to go for reaching the next point. At the pattern you mark these lines/arrows and copy only the points faintly onto the fabric. Then you draw the line between two points at the fabric (with an ordinary pencil line).
You’ll have to choose only the MOST striking points, otherwise you’ll have enough of measuring soon but you didn’t even make it through the first half of the map! Anyway, I was happy when I finished the pencil work… 😉
Starting with the coastline (if there is one on the map you chose) is convenient because after drawing it you can go on with the rivers that flow into the sea, and then you can orientate yourself by the rivers when you draw all the other things.
When doing a forest you just encircle the area (shown in the sketch), and later you paint the whole area with ink. It is almost the same when you do a mountain range: at the time being you just draw a single line (shown in the sketch) where you later draw the real mountains with ink.
When you have managed all that pencil work (congrats! 😉 ) you start drawing the lines with ink.
You can use a fountain pen or even a thin felt-tip. I used both because of the colours: I wanted to use green and black ink and some light green too. And for this light green I just had a felt-tip.
When drawing a forest: Please pay attention to write its name in the circle first!!!
I made this mistake already… I had drawn Mirkwood and then I realized that I still had to write “Rhovanion” in this area… I had to think of something, but now my map has a blemish… 🙁
After you did the rivers, forests etc you go on with the writing.
If you want to use a special font you can you can see some good ones e.g. here at CoE.
Don’t be too rash when writing! Think about the available space on your map and where you best put the writing.
Well, now your map on fabric is almost finished.
Now it is possible to design your map a bit. Draw a frame round it or add any other decoration you like; e.g. a frame of leaves, runes, symbols or a pattern (here at the Last Homely House you can learn how to do Celtic knot work, maybe you´ll check out the article for some decoration for your map).
Pay attention to:
- The fabric …
before your final decision what fabric you’ll take, you should try out whether it is suitable and whether it fulfils the purpose. Take a small piece of fabric and
dye it, apply g-w-mix, and write something on it with different pens/felt-tips. Try out different colours or different colour combinations when test-dyeing, so that you will be satisfied with the result when you’re doing the real map - Before you start drawing / writing on the real map …
practice drawing mountains and forests on a sheet of paper; maybe try out different methods of drawing them. Practice the font - Try out various combinations of colours on your small piece of fabric (on which you’ve tested dyeing and writing) e.g. a red writing and the other things in black or better rivers in blue, forests in green, mountains in brown and a black writing ?
Imagine the overall impression and decide how you will do it. Once it´s drawn on the map you can’t remove it! - If you made a mistake …
you could erase the pencil line, but when you finished pre-drawing you should apply another layer of the g-w-mix where you’ve made the mistake because after erasing the former layer of it has almost vanished.
– – – – – – – –
“I regret to announce this is the end” (as Bilbo once said)
I think it´s quite a lot of work, especially pre-drawing, 😉 but it´s worth doing it!
Sometimes I thought I would never reach the end… but I did. 🙂
I made this kind of map, because didn’t get any parchment and also didn’t manage to make my own (dunno what was wrong…) anyway…
If you have questions or suggestions: please PM me!
– – – – – – – –
by ainithil ~member of the realm of Lórien~
(thanks to magicfire for the idea with the glue-water-mix and to Tinuviel_Elena for the link to the patterns of the maps)

3 Comments
this is so cool
Your work is so great and beautiful!!! Thanks a lot for the instructions)
I’ve just have an idea on making the work a little faster. As I understood, you are copying the map just having a picture in front of you. But you can put the fabric on the picture and then put them both against the window, so that you’ll see the picture from the fabric. That way you wouldn’t need to draw in by yourself.
And another question: wouldn’t it be more convenient to use a carbon paper to make a draft before painting?
Thank you for a brilliant idea! I’ll try to make this kind or a map when I have some spare time;)
yeah, that would definitely be faster ^^
I think it was no option at that time, because my fabric was too thick to see through :/
So the carbon paper could be good anyway (I hadn’t had any)
(sorry for the late answer ^^’ I don’t get any notifications here)